One of the most common challenges I come across with users trying to work on developing the .NET
language bindings is how to set up an environment on their machine to be able to build the language
bindings and get them to build. When I and other committers facilitate the "Fix a Bug, Become a
Committer" workshop at various Selenium Conferences, the vast majority of issues we see for people
is in setting up their development environment to get the build tools working. Over the last couple
of years, the Selenium project has put a fair amount of time and energy into unifying the build
system across language bindings, but this is especially challenging for Windows users, as most of
the tooling for open source software projects treat Windows as a second-class citizen. I've had to
build and rebuild development environments often enough that I understand all of the gotchas involved
with setting up such an environment, but I've never documented the process outside of my own head.
This post is an attempt to provide a more definitive set of steps for setting up such an environment
for folks interested in building the Selenium .NET bindings on their own.
Second, we will be running several commands from the command line. This seems like it should be table stakes for most open source developers, but there are many, many effective developers who rely solely on graphical tools to do their work, especially on Windows. If you are not comfortable with opening a command prompt and executing commands within it, you will need to become more comfortable with it working with the Selenium code base.
Third, you will need administrative privileges on your machine to configure the environment. Unfortunately, there is no way around this. I recognize this is a barrier to entry for some people, but a properly configured environment requires several tools that would not be on a typical IT department's install list.
Finally, to install the tooling in this document, we will be using Chocolatey (https://chocolatey.org/). It's possible to accomplish all of these installs manually, and if you want to do this, you're welcome to, but you'll need to make sure everything happens post-install, like environment variables and paths getting updated to enable things to run from a command line. Installing the tooling manually will be outside the scope of this document.

In the Update and Security section, choose "For developers," and turn on "Developer mode." Windows will install the feature for Developer mode.


In the resulting PowerShell window, type the following command:
Set-ExecutionPolicy Bypass -Scope Process -Force; [System.Net.ServicePointManager]::SecurityProtocol = [System.Net.ServicePointManager]::SecurityProtocol -bor 3072; iex ((New-Object System.Net.WebClient).DownloadString('https://chocolatey.org/install.ps1'))
When this is done, you should be able to type choco into the PowerShell command prompt and receive an informational message that includes the version of Chocolatey installed.
choco install git
When this command completes, you should be able to open a regular command prompt and type git, and receive an information message about the usage of Git.
choco install openjdk11
When this command completes, you should be able to open a regular command prompt and type javac, and receive an information message about the use of the Java compiler. If you can type java and receive an informational message, but typing javac yields a "command not recognized" error, you've installed a Java Runtime Environment (JRE), and not a Java Development Kit (JDK). You must have a JDK.
choco install python
When this command completes, you should be able to open a regular command prompt and type python, and enter the Python interactive debugging environment (also called a REPL). To exit the REPL, enter quit().
choco install visualstudio2019community
When the command completes, you should have a working installation of Visual Studio on your machine. You may need to reboot to fully complete the installation. After installing Visual Studio, you will need to make sure the correct optional components are installed as well. To do this, launch the Visual Studio Installer from the Windows Start Menu.

Once the installer launches, click the "Modify" button.

In the ensuing component selection dialog, make sure that the ".NET desktop development" workflow is installed, and that the following optional components are installed as part of that workflow:

You will also need to make sure the "Desktop development with C++" workflow is installed, and then you can click the "Modify" button to install the optional components.

Once the installation is complete, you can launch Visual Studio to make sure the IDE runs properly.
choco install msys2 --params "/InstallDir=C:\tools\msys64"
Once the installation is completed, you should see the MSYS2 tools installed at the location you specified. So that Bazel can also find those tools at the specified location, you will need to set up an environment variable for Bazel to use. To accomplish this, the easiest thing to do is search for the environment variable editor using the Windows Start Menu search feature, and choose the option to "Open."

In the Environment Variables dialog, click the "New..." button under System variables.

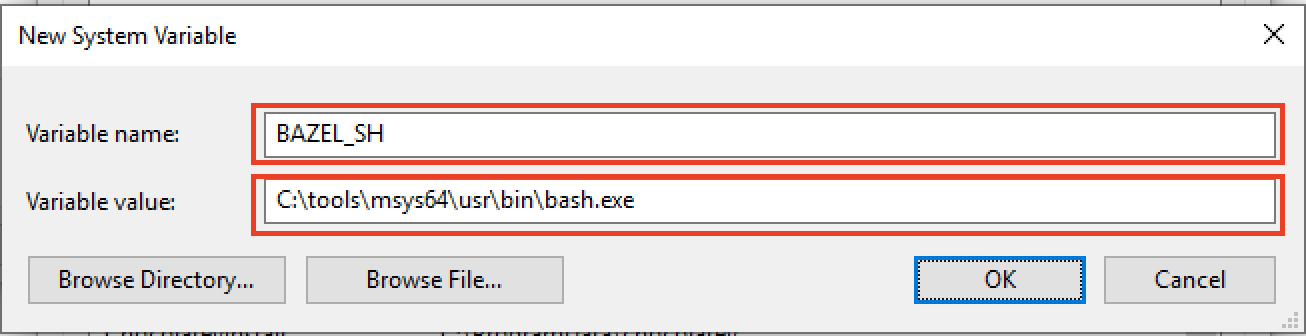
In the New System Variable dialog, enter BAZEL_SH as the variable name, and the path to bash.exe in your MSYS2 installation as the variable value. The bash.exe executable will be located in the usr\bin directory of your MSYS2 installation. Using our example path for installation, the path to add would be C:\tools\msys64\usr\bin\bash.exe. If you chose a different installation path, your path to enter would be different.

Once you have entered those values, click OK on the New System Variable and the Environment Variables dialogs.
choco install bazel
When this command completes, you should be able to open a regular command prompt and type bazel, and receive an informational message about the use of the command.

In the resulting command prompt window, navigate to an appropriate directory, and clone the project. I usually keep my projects in a directory called C:\Projects, but you can choose whatever directory you like. If you use a different directory structure, keep in mind that you'll need to use those paths when entering commands. To clone the project in your desired location, enter the following commands in your command prompt.
cd \Projects
git clone https://github.com/SeleniumHQ/selenium
A quick warning, the Selenium Git repository is very, very large. This is due to the use of a monorepo, where dependencies are kept checked into the source tree so that anyone can build without the requirement of a network connection to download dependencies. If you don't need the full source control history, or are in a hurry, you can add the --depth=1 switch to the clone command (e.g., git clone --depth=1 https://github.com/SeleniumHQ/selenium) to only get the tip of the tree and build from there.
When this command finishes, the repo should be cloned to your local machine in the selenium subdirectory. To make sure that you can build from the command line, enter the following commands in your command prompt window.
cd selenium
bazel build //dotnet/test/common:chrome
This will build everything the .NET language bindings depend on, including the JavaScript automation atoms, the Java test web server, and the .NET bindings assemblies as well as the NUnit test assemblies, but will stop just short of running the tests. Be aware that this will take awhile the first time you attempt it. Many of the tasks will not require rebuilds once built for the first time.
In an elevated PowerShell command window, run the following commands:
Set-ExecutionPolicy Bypass -Scope Process -Force; [System.Net.ServicePointManager]::SecurityProtocol = [System.Net.ServicePointManager]::SecurityProtocol -bor 3072; iex ((New-Object System.Net.WebClient).DownloadString('https://chocolatey.org/install.ps1'))
choco install git
choco install openjdk11
choco install python
choco install visualstudio2019community
choco install msys2 --params "/InstallDir=C:\tools\msys64"
choco install bazel
Update the Visual Studio installation through the installer to include the ".NET desktop development" and "Desktop development with C++" workflows with the appropriate optional components, and add the BAZEL_SH environment variable to point to the MSYS2 Bash shell executable. After installing these packages, you'll probably want to reboot your machine.
In a Developer Command Prompt for Visual Studio 2019, run the following commands:
cd \Projects
git clone https://github.com/SeleniumHQ/selenium
cd selenium
bazel build //dotnet/test/common:chrome
To run the .NET tests from the command line, a few additional configuration options are required, but we will cover that in a separate blog post. If you run into issues with these steps, feel free to contact me on the Selenium IRC (#selenium at freenode.net) or Slack channels.
A Couple of Preliminary Notes
First, these instructions will be customized to use Windows 10. They may work on other versions of Windows, but you should not expect the screenshots included later in this document to exactly match up with your experience.Second, we will be running several commands from the command line. This seems like it should be table stakes for most open source developers, but there are many, many effective developers who rely solely on graphical tools to do their work, especially on Windows. If you are not comfortable with opening a command prompt and executing commands within it, you will need to become more comfortable with it working with the Selenium code base.
Third, you will need administrative privileges on your machine to configure the environment. Unfortunately, there is no way around this. I recognize this is a barrier to entry for some people, but a properly configured environment requires several tools that would not be on a typical IT department's install list.
Finally, to install the tooling in this document, we will be using Chocolatey (https://chocolatey.org/). It's possible to accomplish all of these installs manually, and if you want to do this, you're welcome to, but you'll need to make sure everything happens post-install, like environment variables and paths getting updated to enable things to run from a command line. Installing the tooling manually will be outside the scope of this document.
Setting Up Windows Features
You will need to have certain features enabled in Windows 10 to be able to successfully build Selenium code. Specifically, you will need to turn on "Developer Mode." To do this, you can open the Windows 10 Settings app (click the gear icon on the Start Menu), and choosing "Update and Security."
In the Update and Security section, choose "For developers," and turn on "Developer mode." Windows will install the feature for Developer mode.

Installing the Tools
To work in the Selenium .NET code base on Windows, we are going to need the following tools:- Chocolatey, which we will use for installation of other tools.
- Git, which will be used for getting and updating the Selenium source code
- A Java Development Kit (JDK) which will be used to build some components needed for testing the .NET bindings. Note that a JDK is different from a Java Runtime Environment (JRE) which is what most people install when they "install Java," and we will be using OpenJDK, version 11.
- Python, which some build rules used by the Selenium build process requires. We will install the latest Python 3.x version.
- Visual Studio 2019, for modifying and building the C# code that make up the .NET bindings. It is perfectly acceptable to install the Community Edition to work with the code base.
- MSYS2, which is an alternative shell environment that provides Unix-like commands. While the normal build process using Visual Studio does not require this, the command-line cross-language, cross-platform build tool used to produce the .NET bindings assemblies does require it.
- Bazel, the command-line build tool used to build components of the Selenium project in multiple supported languages, including C#.
Install Chocolatey
To install Chocolatey, you'll need to run an install script from within PowerShell, an enhanced command line available in Windows. We also need to run PowerShell as an administrator so that the subsequent packages being installed can be run without further elevation prompts. To open PowerShell as an administrator, the easiest thing to do is search for it using the Windows Start Menu search feature, and choose the option to "Run as Administrator."
In the resulting PowerShell window, type the following command:
Set-ExecutionPolicy Bypass -Scope Process -Force; [System.Net.ServicePointManager]::SecurityProtocol = [System.Net.ServicePointManager]::SecurityProtocol -bor 3072; iex ((New-Object System.Net.WebClient).DownloadString('https://chocolatey.org/install.ps1'))
When this is done, you should be able to type choco into the PowerShell command prompt and receive an informational message that includes the version of Chocolatey installed.
Install Git
The Selenium project uses Git (https://git-scm.com/) as its source control system. To get the source code on your machine and to keep it updated, you will need to have Git installed. To install it using Chocolatey, type the following command in the PowerShell window, and answer the prompts:choco install git
When this command completes, you should be able to open a regular command prompt and type git, and receive an information message about the usage of Git.
Install OpenJDK 11
The .NET language bindings of the Selenium project share the same pages for testing that the Java language bindings do. To enable the running of the .NET bindings' test suite, we need to be able to build the Java language bindings as well, so that we can build the web server that the test suite uses to serve the pages for the browser to browse to during the tests. The Selenium project requires Java 11 to build the Java components, and the OpenJDK is preferred. To install OpenJDK 11 using Chocolatey, type the following command in the PowerShell window, and answer the prompts.choco install openjdk11
When this command completes, you should be able to open a regular command prompt and type javac, and receive an information message about the use of the Java compiler. If you can type java and receive an informational message, but typing javac yields a "command not recognized" error, you've installed a Java Runtime Environment (JRE), and not a Java Development Kit (JDK). You must have a JDK.
Install Python
Some of the Bazel rules used by the Selenium project require Python (https://www.python.org/) to execute. To install Python using Chocolatey, type the following command in the PowerShell window, and answer the prompts:choco install python
When this command completes, you should be able to open a regular command prompt and type python, and enter the Python interactive debugging environment (also called a REPL). To exit the REPL, enter quit().
Install Visual Studio 2019 Community Edition
The Selenium project uses Bazel as its cross-language build tool, which means that to build the .NET bindings, you need the prerequisites that Bazel requires to build C# code, including Visual Studio 2019, and the project will build successfully using the free Community Edition (https://visualstudio.microsoft.com/downloads/). Among those prerequisites are a C++ compiler. Even though you may not be building any C++ code as part of the Selenium project, Bazel still requires access to a C++ compiler to build tools to compile other language elements. Additionally, after you install Visual Studio, you may need to add optional components that are not automatically selected during the Visual Studio install. To install Visual Studio 2019 Community Edition using Chocolatey, type the following command in the PowerShell window and answer the prompts.choco install visualstudio2019community
When the command completes, you should have a working installation of Visual Studio on your machine. You may need to reboot to fully complete the installation. After installing Visual Studio, you will need to make sure the correct optional components are installed as well. To do this, launch the Visual Studio Installer from the Windows Start Menu.

Once the installer launches, click the "Modify" button.

In the ensuing component selection dialog, make sure that the ".NET desktop development" workflow is installed, and that the following optional components are installed as part of that workflow:
- .NET Core development
- .NET Core 2.1 LTS Runtime
- .NET Framework 4-4.6 development tools
- .NET Framework 4.6.1 development tools
- .NET Framework 4.6.2 development tools
- .NET Framework 4.7 development tools
- .NET Framework 4.7.1 development tools
- .NET Framework 4.8 development tools

You will also need to make sure the "Desktop development with C++" workflow is installed, and then you can click the "Modify" button to install the optional components.

Once the installation is complete, you can launch Visual Studio to make sure the IDE runs properly.
Install MSYS2
Some of the build rules that the Bazel build tool uses in the Selenium build process are not completely ported to work seamlessly with Windows, and hard-code the use of Unix-like shell commands. To support this as part of the build process, Bazel will require the installation of the MSYS2 subsystem (https://www.msys2.org/). Because of other configuration requirements, it is important to know the directory where the MSYS2 system is installed. This example will use C:\tools\msys64 as the install location, but you can substitute another location if you wish. To install MSYS2 to a specific location using Chocolatey, type the following command in the PowerShell window and answer the prompts.choco install msys2 --params "/InstallDir=C:\tools\msys64"
Once the installation is completed, you should see the MSYS2 tools installed at the location you specified. So that Bazel can also find those tools at the specified location, you will need to set up an environment variable for Bazel to use. To accomplish this, the easiest thing to do is search for the environment variable editor using the Windows Start Menu search feature, and choose the option to "Open."

In the Environment Variables dialog, click the "New..." button under System variables.

In the New System Variable dialog, enter BAZEL_SH as the variable name, and the path to bash.exe in your MSYS2 installation as the variable value. The bash.exe executable will be located in the usr\bin directory of your MSYS2 installation. Using our example path for installation, the path to add would be C:\tools\msys64\usr\bin\bash.exe. If you chose a different installation path, your path to enter would be different.
Once you have entered those values, click OK on the New System Variable and the Environment Variables dialogs.
Install Bazel
You can now install the final tool in the development environment tool chain, Bazel (https://bazel.build/). Bazel is a cross-language build environment that creates repeatable builds and uses caching to avoid building components unnecessarily, dramatically decreasing build times. To install Bazel using Chocolatey, type the following command in the PowerShell window and answer the prompts.choco install bazel
When this command completes, you should be able to open a regular command prompt and type bazel, and receive an informational message about the use of the command.
Getting and Building Selenium Code
After running all of the installers for getting the build tools, it's probably a good idea to reboot your machine so that registry changes from the installers can take effect. Once the reboot is complete, and now that we have all of the tooling in place to build Selenium artifacts, you can fetch the code from the source control repository on GitHub. To make and submit changes to the project, you will need to fork the project on GitHub, and submit pull requests to the project. Performing those tasks is beyond the scope of this document. To get the Selenium code base copied to your machine, open a Developer Command Prompt for Visual Studio 2019 from the Windows Start Menu.
In the resulting command prompt window, navigate to an appropriate directory, and clone the project. I usually keep my projects in a directory called C:\Projects, but you can choose whatever directory you like. If you use a different directory structure, keep in mind that you'll need to use those paths when entering commands. To clone the project in your desired location, enter the following commands in your command prompt.
cd \Projects
git clone https://github.com/SeleniumHQ/selenium
A quick warning, the Selenium Git repository is very, very large. This is due to the use of a monorepo, where dependencies are kept checked into the source tree so that anyone can build without the requirement of a network connection to download dependencies. If you don't need the full source control history, or are in a hurry, you can add the --depth=1 switch to the clone command (e.g., git clone --depth=1 https://github.com/SeleniumHQ/selenium) to only get the tip of the tree and build from there.
When this command finishes, the repo should be cloned to your local machine in the selenium subdirectory. To make sure that you can build from the command line, enter the following commands in your command prompt window.
cd selenium
bazel build //dotnet/test/common:chrome
This will build everything the .NET language bindings depend on, including the JavaScript automation atoms, the Java test web server, and the .NET bindings assemblies as well as the NUnit test assemblies, but will stop just short of running the tests. Be aware that this will take awhile the first time you attempt it. Many of the tasks will not require rebuilds once built for the first time.
Summary
At this point, you should be able to successfully build the .NET bindings from the command line using Bazel. You should also be able to open the WebDriver.NET.sln file in the project's source tree and modify, build, and test using Visual Studio. As a reminder, here is a summary of the steps, assuming you are using the paths that are listed in the preceding text; your paths may need to be different if you've chosen different locations.In an elevated PowerShell command window, run the following commands:
Set-ExecutionPolicy Bypass -Scope Process -Force; [System.Net.ServicePointManager]::SecurityProtocol = [System.Net.ServicePointManager]::SecurityProtocol -bor 3072; iex ((New-Object System.Net.WebClient).DownloadString('https://chocolatey.org/install.ps1'))
choco install git
choco install openjdk11
choco install python
choco install visualstudio2019community
choco install msys2 --params "/InstallDir=C:\tools\msys64"
choco install bazel
Update the Visual Studio installation through the installer to include the ".NET desktop development" and "Desktop development with C++" workflows with the appropriate optional components, and add the BAZEL_SH environment variable to point to the MSYS2 Bash shell executable. After installing these packages, you'll probably want to reboot your machine.
In a Developer Command Prompt for Visual Studio 2019, run the following commands:
cd \Projects
git clone https://github.com/SeleniumHQ/selenium
cd selenium
bazel build //dotnet/test/common:chrome
To run the .NET tests from the command line, a few additional configuration options are required, but we will cover that in a separate blog post. If you run into issues with these steps, feel free to contact me on the Selenium IRC (#selenium at freenode.net) or Slack channels.